Qt5 Cross-Compile – A530
This guide describes how to cross-compile Qt5 (using version 5.9.2) for ARTIK 530 using Ubuntu 16.04 on your development PC. You have to prepare an ARTIK 530 sysroot to make sure that the compiler can find armhf libraries and header files.
After following this procedure to set up a host PC (such as Ubuntu 16.04 under VirtualBox) and ARTIK 530 or 530s board, the Qt5 applications cross-built on the host will run on the ARTIK 530 target system.
Qt5 applications are cross-compiled on the host PC, not the ARTIK 530.
You will be developing and cross compiling your Qt5 application on the host PC, and then copying the binary file to your intended ARTIK 530 target. Building Qt5 applications natively on the ARTIK 530 is not practical; Qt application content is usually graphics-rich and requires more editing capability than a simple terminal console can provide.
Setting Up Build Environment
-
Set up the build environment on your development PC.
sudo apt update
sudo apt upgrade
sudo apt install qemu-user-static git gcc-arm-linux-gnueabihf
sudo apt install g++-arm-linux-gnueabihf
sudo apt install gcc-armhf-linux-gnu
sudo apt install g++-armhf-linux-gnu
sudo apt install linux-libc-dev:i386
sudo apt build-dep qt5-default
sudo apt install gperf -
Download the patch file and copy it into your root directory.
-
Prepare directory structures (assuming the main directory is located in
~/qt5).mkdir ~/qt5
cd ~/qt5
cp ~/0001-qtbase-mkspec-add-artik-device-conf.patch . -
Download QT5 5.9.2 version tarball
1
wget http://download.qt.io/official_releases/qt/5.9/5.9.2/single/qt-everywhere-opensource-src-5.9.2.tar.xz
-
Download the artik530 rootfs tarball from github
1
wget https://github.com/SamsungARTIK/ubuntu-build-service/releases/download/release%2FA530_os_3.3.0/ubuntu-arm-artik530-rootfs-0530GC0F-44U-DD60-20180406.010001-dccbb9d00a8aa1eade1a5604ee0cd7e7.tar.gz
-
Make the sysroot can be emulated by QEMU user binary.
1
2
3
mkdir artik530_sysroot
sudo tar xf ~/qt5/ubuntu-arm-artik530-rootfs-0530GC0F-44U-DD60-20180406.010001-dccbb9d00a8aa1eade1a5604ee0cd7e7.tar.gz -C ~/qt5/artik530_sysroot
sudo cp /usr/bin/qemu-arm-static ~/qt5/artik530_sysroot/usr/bin
-
Make updates to the ARTIK 530 sysroot emulation.
-
Go into the chroot.
sudo chroot ~/qt5/artik530_sysroot -
Install QT5 build dependent packages
apt update
locale-gen en_US.UTF-8
apt install build-essential libfreetype6-dev
apt build-dep qt5-defaultDid you get a 'source URIs' error message? See below.
-
Resolve host name resolution on your sysroot.
sudo cp /etc/resolv.conf artik530_sysroot/etc/resolv.conf -
Exit the chroot.
exit
-
-
Fix symlinks to be recognized from cross compile environments.
1
2
3
wget https://raw.githubusercontent.com/riscv/riscv-poky/master/scripts/sysroot-relativelinks.py
chmod +x sysroot-relativelinks.py
sudo ./sysroot-relativelinks.py ~/qt5/artik530_sysroot                                          |
Compiling QT5
-
Extract the QT5 tarball
tar xf qt-everywhere-opensource-src-5.9.2.tar.xz -
Locate the 0001-qtbase-mkspec-add-artik-device-conf.patch to "~/qt5" directory and apply it
cd qt-everywhere-opensource-src-5.9.2
patch -p1 < ../0001-qtbase-mkspec-add-artik-device-conf.patch -
Configure Qt5 compile options.
If you don't want to compile and include Qt5 examples, also add-make libs1 2 3 4 5 6 7 8 9 10 11 12 13 14 15 16 17 18 19 20 21 22
 ./configure \
     -v \
     -confirm-license \
     -opensource \
     -release \
     -shared \
     -accessibility \
     -glib \
     -optimized-qmake \
     -no-pch \
     -system-sqlite \
     -no-directfb \
     -opengl es2 \
     -eglfs \
     -kms \
     -skip qtwebengine \
     -sysroot ~/qt5/artik530_sysroot/ \
     -device linux-artik530-g++ \
     -device-option CROSS_COMPILE=arm-linux-gnueabihf- \
     -no-use-gold-linker \
     -prefix /usr/local/qt5 \
     -extprefix $(pwd)/../qt_inst                          |
Note: You only need to add the
-skip qtwebengineline if you see any error related to “qtwebengine” while compiling. -
Compile it
make -j`nproc`If you see this error, just run the make again and it will resolve itself.
stderr: Package freetype2 was not found in the pkg-config search path. Perhaps you should add the directory containing `freetype2.pc' to the PKG_CONFIG_PATH environment variable\
-
Install the result. The files will be in your
~/qt5/qt_instdirectory.make install -j`nproc`
Transferring Generated Binaries
-
Archive the build results.
cd ~/qt5/qt_inst
tar zcf ../qt5_inst.tar.gz * -
Send the tarball to your ARTIK 530 board (replace {TARGET_IP} with your own).
scp ~/qt5/qt5_inst.tar.gz root@{TARGET_IP}:~/
Installing Qt5 Binaries
These steps all take place on your ARTIK board.
-
Extract the tarball.
mkdir -p /usr/local/qt5
tar xf ~/qt5_inst.tar.gz -C /usr/local/qt5 -
Install Qt5 dependencies. Make sure that your board can access the ARTIK repository because it must download the DRM packages from there.
apt updateapt install libharfbuzz0b weston -
Install the Mali GPU library. You can get this file from the compressed file set downloaded as noted here.
dpkg -i opengl-es-mali-utgard-wayland_7.0-2.1_armhf.deb
apt install -f -
Set the Qt5 library path.
echo /usr/local/qt5/lib | tee /etc/ld.so.conf.d/01-qt5.conf
ldconfig
Create a file 'kms.json' in your root directory or elsewhere to hold the configuration parameters.
a) Put the following lines in it, editing out the unneeded display devices.
UNKNOWN1 refers to the MIPI display.
{

  "device": "/dev/dri/card0",

  "hwcursor": false,

  "outputs": [

    {

    "name": "LVDS1",

    "mode": "1024x600"

    },

    {

    "name": "UNKNOWN1",

    "mode": "1080x1920"

    },

    {

    "name": "HDMI1",

    "mode": "1920x1080"

    }

  ]

}
b) Add these lines to your /etc/profile or other start-up batch file to point Qt to the right parameters. Use the path you chose above for 'kms.json'.
export QT_QPA_PLATFORM=eglfs

export QT_QPA_EGLFS_KMS_CONFIG=~/kms.json
Now, after opening a fresh terminal instance to utilize the new settings, run the webengine example.
cd /usr/local/qt5/examples/opengl/cube
./cube -platform eglfs
Source URI Error
When executing
sudo apt-get build-dep qt5-default
if you got an error like
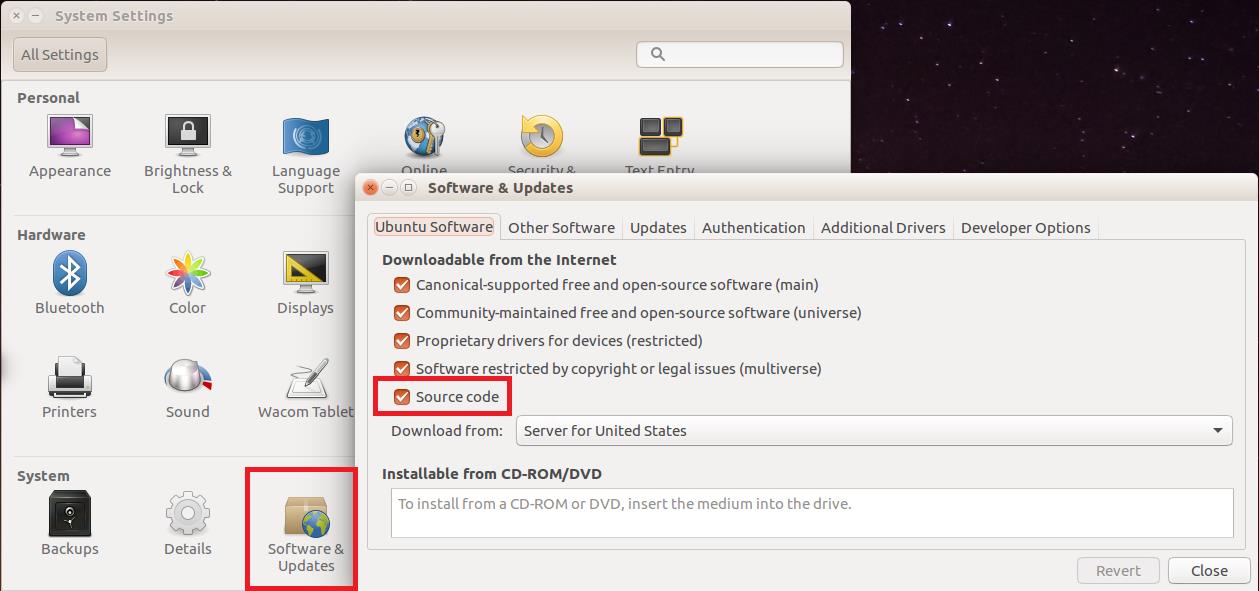
E: You must put some 'source' URIs in your sources.list
it means that you need to modify the software repositories configuration. One method is to click to enable the “source code” box under Ubuntu Software configuration as indicated in the screen capture below. For advanced users, the other method available is to directly modify the software repositories configuration file /etc/apt/sources.list