AWS IoT Embedded C SDK on ARTIK 05X
Using the AWS IoT Embedded C SDK on ARTIK 05x requires integration with Tizen RT. As the primary governing standards in Tizen RT are POSIX and ANSI standards, migrating 3rd party libraries to the OS is not complicated.
Prerequisites
For the procedures described in this article, you'll need to set up a development environment on the host machine and cross compile Tizen RT source code with AWS IoT Embedded C SDK for the ARTIK 05x device.
Tizen RT requirements
The full Tizen RT source development environment is required (a procedure is not available using the ARTIK IDE/SDK at this time).
-
Follow the setup guide to install the Linux development environment and cross-compilation toolchain for ARTIK 05x devices.
-
Clone the latest Tizen RT tree to your Linux host machine.
git clone https://github.com/SamsungARTIK/TizenRT
AWS requirements
To use the AWS IoT SDK on ARTIK Tizen RT modules, you need to have a basic understanding of AWS IoT. Refer to the AWS IoT device just-in-time registration (JITR) articles for an overview. We could use JITR here, but instead we'll keep it simple and let you register the device manually.
First, follow the introductory article to set up your AWS account and credentials.
Then, follow the AWS IoT Getting Started Guide to familiarize yourself with AWS IoT manual setup concepts:
-
Sign in to the AWS IoT Console
-
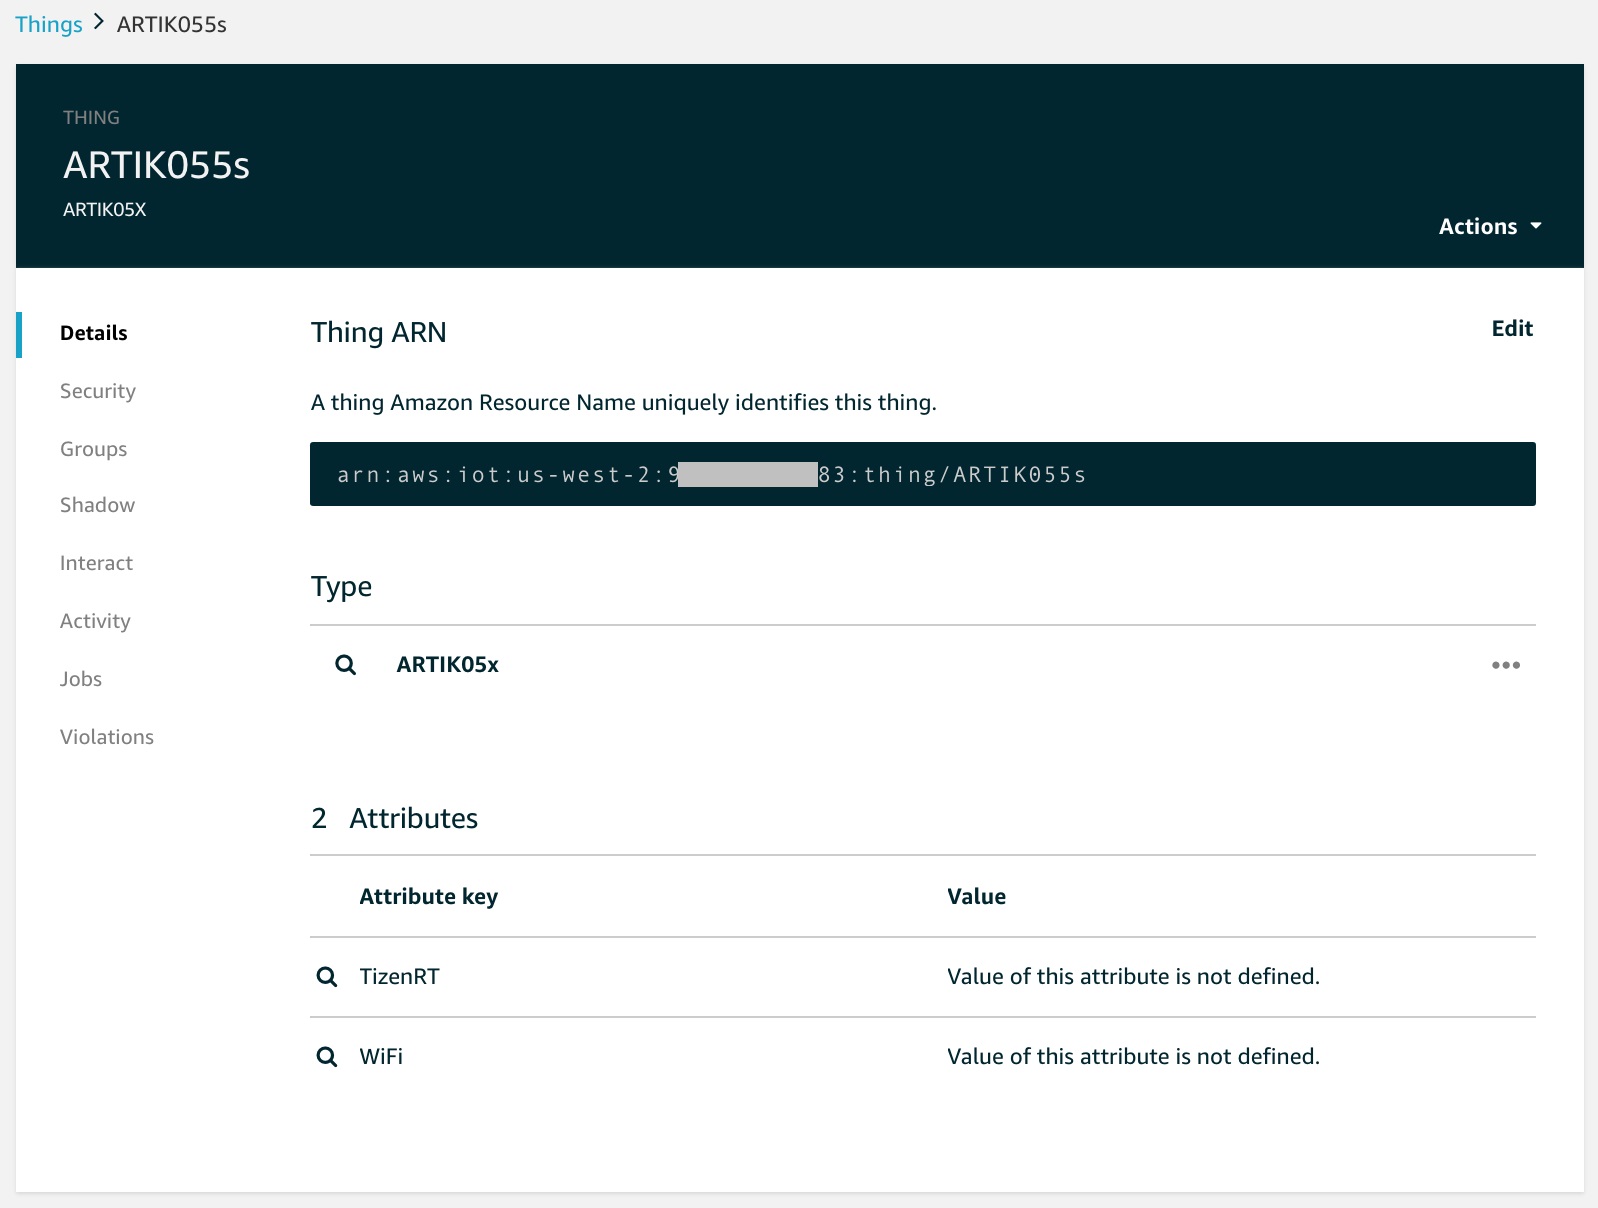
Register a Device in the Registry (here we show a Thing named ARTIK055s)
-
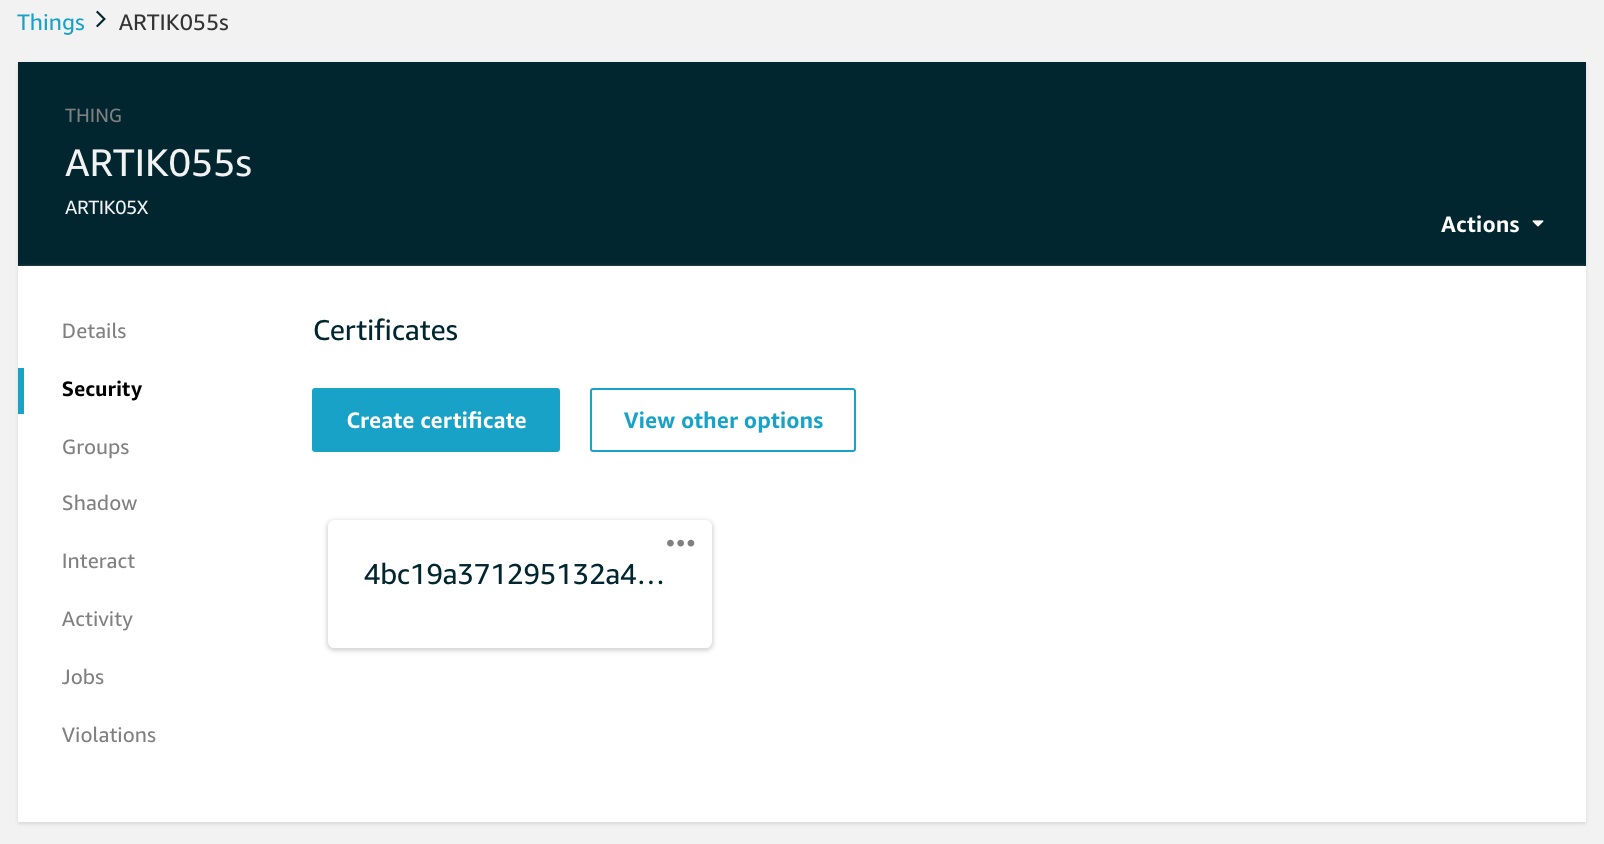
Create and activate a Device Certificate. Download the certificate, private key and root CA for AWS, and save to your host machine. The AWS Root CA can be downloaded here.
-
Create an AWS IoT Policy to specify what publish/subscribe rights your device will have
-
Attach the policy to the device certificate
-
Attach the certificate to your ARTIK055s Thing.
Getting Tizen RT, AWS IoT Device SDK sources
Download the file bundle for this tutorial.
Unzip the software bundle on your development system. You should find:
- aws.tar.xz
- aws_examples.tar.xz
- certData.tar.xz
- mbedtls_header.tar.xz
- patch.tar.xz
In the Tizen RT source tree, you can find 3rd party libraries under the external directory, and example applications under apps/examples. You will need to move each of these tar files into the directory specified in the installation instructions that follow.
Prepare AWS IoT sample apps
cd ~/TizenRT/apps/examples
From the software bundle, copy the AWS IoT sample apps tar file, then extract the contents using
tar xvfz aws_examples.tar.gz
Prepare AWS IoT Embedded C SDK
We strongly suggest that you take advantage of the integration we have already done for you, especially if you don’t have time for the step-by-step integration. Otherwise, If you want to understand the nuts and bolts of Tizen RT integration, you can follow the full procedure.
To follow the shortcut approach:
-
Copy over and untar the aws.tar.gz file in the directory noted.
cd ~/TizenRT/externaltar xvfz aws.tar.gzIn aws.tar.gz, we already take care of configuring AWS and connecting the AWS sample app.
-
Jump to Configure Dependencies.
-
Continue with Configure Makefile, Kconfig
-
When finished, jump directly to Configure Certificates and AWS IoT endpoints.
To perform the integration yourself:
-
Check out AWS IoT Device SDK to the external directory.
cd ~/TizenRT/externalgit clone https://github.com/aws/aws-iot-device-sdk-embedded-C.git -
Rename the AWS SDK folder to aws.
mv aws-iot-device-sdk-embedded-C aws -
Proceed with all steps and sub-steps shown below.
Step 1: Configuring AWS IoT Embedded C SDK for TizenRT
Now, we will compile AWS IoT Embedded C SDK into libexternal.a
Copy over required Makefiles
-
Rename the original SDK Makefile to a different name, and rename platform/linux and samples/linux directory to platform/TizenRT and samples/TizenRT. Under ~/TizenRT/external/, do the following.
cd awsmv Makefile Makefile.awsmv platform/linux platform/TizenRTmv samples/linux samples/TizenRT -
Install the patch. Start from the main directory.
cd ~/TizenRT -
From the software bundle, copy the patch package, then extract the contents using
tar xvfz patch.tar.gz -
Recursively copy over all the required Makefiles from the patch file to the SDK directory.
cp –rp ./patch/external/aws/* ./TizenRT/external/aws/
Configure dependencies
The AWS IoT Device SDK requires mbedtls.
-
Create external/include directory.
cd ~/TizenRT/external
mkdir include
cd include -
From the software bundle, copy the mbedtls header tar file, then extract the contents using
tar xvfz mbedtls_header.tar.gz
Configure external library Makefile, KConfig
The bold lines are required changes.
-
In external/KConfig, search for the source "$EXTERNALDIR/sysview/Kconfig" block, and add the bold line before it. This will include AWS IoT Embedded C SDK configuration option into Tizen RT menuconfig.
source “$EXTERNALDIR/aws/Kconfig”

source “$EXTERNALDIR/sysview/Kconfig”
-
In external/Makefile, add the bold lines below between lines in order to compile AWS IoT Embedded C SDK into Tizen RT.
-
Look for ifeq ($(CONFIG_DM),y) and ifeq ($(CONFIG_SYSVIEW),y), and include the ifeq ($(CONFIG_AWS_SDK), y) block below in between.
ifeq ($(CONFIG_DM),y)
CFLAGS+=-I$(TOPDIR)/../framework/include/dm
endif

ifeq ($(CONFIG_AWS_SDK), y)
include aws/Make.defs
endif

ifeq ($(CONFIG_SYSVIEW),y)
include sysview/Make.defs
endif
-
Add the following lines right after the code above.
# External Directories
# BUILDIRS is the list of top-level directories containing
# Make.defs files

BUILDIRS := $(dir $(wildcard */Make.defs))

# CONFIGURED_EXT is the external directories that should be built
# in the current configuration.

CONFIGURED_EXT =

define Add_EXTLIB
  include $(1)Make.defs
endef

$(foreach BDIR, $(BUILDIRS), $(eval $(call Add_EXTLIB,$(BDIR))))

define SDIR_template
$(1)_$(2):
  $(Q) $(MAKE) -C $(1) $(2) TOPDIR="$(TOPDIR)" EXTDIR="$(EXTDIR)"
endef

$(foreach SDIR, $(CONFIGURED_EXT), $(eval $(call SDIR_template,$(SDIR),all)))
$(foreach SDIR, $(CONFIGURED_EXT), $(eval $(call SDIR_template,$(SDIR),depend)))
$(foreach SDIR, $(BUILDIRS), $(eval $(call SDIR_template,$(SDIR),clean)))
$(foreach SDIR, $(BUILDIRS), $(eval $(call SDIR_template,$(SDIR),distclean)))
-
Look for the part that generates the final $(BIN) , and add the bold part below. This will include AWS SDK into the libexternal.a.
$(BIN): $(OBJ) $(foreach SDIR, $(CONFIGURED_EXT), $(SDIR)_all) iotivity_build

  $(call ARCHIVE, $@, $(OBJS))
-
Look for the part that cleans the binaries, and add the bold lines below.
artiksdk_clean:
ifeq ($(CONFIG_ARTIK_SDK),y)
  $(Q) $(MAKE) -C artik-sdk clean
endif

awssdk_clean:
ifeq ($(CONFIG_AWS_SDK), y)
  $(Q) echo "Cleaning AWS IoT Device SDK"
  $(Q) rm -f $(TOPDIR)/../external/aws/*.o
endif

custom_clean:
  $(foreach OBJFILE, $(OBJS), rm -f $(OBJFILE))

clean: custom_clean iotivity_clean artiksdk_clean
awssdk_clean
  $(call DELFILE, $(BIN))
  $(call CLEAN, $(OBJS))
  $(call CLEAN)
-
Look for ifeq ($(CONFIG_DM),y) and ifeq ($(CONFIG_SYSVIEW),y), and include the ifeq ($(CONFIG_AWS_SDK), y) block below in between.
-
Add the newly added mbedtls header file path external/include/ to the Makefile.
CFLAGS += -Iinclude
CFLAGS += -I../include
CFLAGS += -Iexternal_libs/jsmn
CFLAGS += -I$(AWS_PLATFORM_DIR)/common
Step 2. Connect AWS IoT sample app to AWS SDK library
The AWS sample apps under ~/TizenRT/apps/examples/aws directory actually link to the sample apps under ~/TizenRT/external/aws/samples.
We need to make few changes to the source code, all under external/aws/samples/TizenRT/
-
In shadow_sample/shadow_sample.c
change
int main(int argc, char argv)
to
int aws_shadow(int argc, argv) -
In shadow_sample_console_echo/shadow_console_echo.c
change
int main(int argc, char argv)
to
int aws_shadow_console_echo(int argc, char argv) -
In subscribe_publish_library_sample/
subscribe_publish_library_sample.c
change
int main(int argc, char argv)
to
int aws_subscribe_publish_library(int argc, char argv) -
In subscribe_publish_sample/subscribe_publish_sample.c
change
int main(int argc, char argv)
to
int aws_subscribe_publish(int argc, char argv)
Step 3. Prepare for compilation
Again, all listed changes are under external/aws/samples/TizenRT/
-
In mbedtls/network_mbedtls_wrapper.c,
add the line indicated.
#include "aws_iot_error.h"
#include "aws_iot_log.h"
#include "network_interface.h"
#include "network_platform.h"
#include “certData.c”
-
In the iot_tls_connect() function, make the following changes to match the function signature.
-
Search for IOT_DEBUG(" . Loading the CA root certificate ...");
In the line below, replace
ret = mbedtls_x509_crt_parse_file(&(tlsDataParams->cacert), pNetwork->tlsConnectParams.pRootCALocation);
withret = mbedtls_x509_crt_parse(&(tlsDataParams->cacert), root_ca_pem, rootCaLen);
-
Moving down a few lines, and look for
IOT_DEBUG(" . Loading the client cert. and key...");In the line below, replaceret = mbedtls_x509_crt_parse_file(&(tlsDataParams->clicert), pNetwork->tlsConnectParams.pDeviceCertLocation);
withret = mbedtls_x509_crt_parse(&(tlsDataParams->clicert), client_cert_pem, clientCertLen);
-
Then look beneath it, and replace
ret = mbedtls_pk_parse_keyfile(&(tlsDataParams->pkey), pNetwork->tlsConnectParams.pDevicePrivateKeyLocation, "");
withret = mbedtls_pk_parse_key(&(tlsDataParams->pkey), client_private_key_pem, clientPrivateKeyLen, NULL, 0);
-
Search for IOT_DEBUG(" . Loading the CA root certificate ...");
In the line below, replace
-
In common/timer_platform.h, add the bold lines below.
/** * definition of the Timer struct. Platform specific */ struct Timer { struct timeval end_time; }; /* Convenience macros for operations on timevals. * NOTE: \`timercmp' does not work for >= or <=. */ #define timerisset(tvp) ((tvp)->tv_sec || (tvp)->tv_usec) #define timerclear(tvp) ((tvp)->tv_sec = (tvp)->tv_usec = 0) #define timercmp(a, b, CMP) (((a)->tv_sec == (b)->tv_sec) ? ((a)->tv_usec CMP (b)->tv_usec) : ((a)->tv_sec CMP (b)->tv_sec)) #define timeradd(a, b, result) do { (result)->tv_sec = (a)->tv_sec + (b)->tv_sec; (result)->tv_usec = (a)->tv_usec + (b)->tv_usec; if ((result)->tv_usec >= 1000000) { ++(result)->tv_sec; (result)->tv_usec -= 1000000; } } while (0) #define timersub(a, b, result) do { (result)->tv_sec = (a)->tv_sec - (b)->tv_sec; (result)->tv_usec = (a)->tv_usec - (b)->tv_usec; if ((result)->tv_usec < 0) { --(result)->tv_sec; (result)->tv_usec += 1000000; } } while (0) -
In subscribe_publish_sample/aws_iot_config.h, look for
#define DISABLE_METRICS false
change it to
#define DISABLE_METRICS 0
Step 4. Configure certificates and AWS IoT endpoints
certData.tar.gz
From the software bundle, copy the certData.tar.gz file to the directory indicated and untar it.
cd ~/TizenRT/external/aws/certs/
tar xvfz certData.tar.gz
Configuring certificates
Open certData.c and follow the comments to copy the whole lines in the root CA certificate file (downloadable here), cert.pem, and privateKey.pem, and paste the lines in string format to arrays root_ca_pem, client_cert_pem and client_private_key_pem respectively.
Here is an example, using root_ca_pem, of how these arrays should look once formatted in your code – append \r\n to each line and enclose the line in quotes.
1 2 3 4 5 6 7 8 9 10 11 12 13 14 15 16 17 18 19 20 21 22 23 24 25 26 27 28 29 | const unsigned char root_ca_pem[] = "-----BEGIN CERTIFICATE-----\r\n" "MIIE0zCCA7ugAwIBAgIQGNrRniZ96LtKIVjNzGs7SjANBgkqhkiG9w0BAQUFADCB\r\n" "yjELMAkGA1UEBhMCVVMxFzAVBgNVBAoTDlZlcmlTaWduLCBJbmMuMR8wHQYDVQQL\r\n" "ExZWZXJpU2lnbiBUcnVzdCBOZXR3b3JrMTowOAYDVQQLEzEoYykgMjAwNiBWZXJp\r\n" "U2lnbiwgSW5jLiAtIEZvciBhdXRob3JpemVkIHVzZSBvbmx5MUUwQwYDVQQDEzxW\r\n" "ZXJpU2lnbiBDbGFzcyAzIFB1YmxpYyBQcmltYXJ5IENlcnRpZmljYXRpb24gQXV0\r\n" "aG9yaXR5IC0gRzUwHhcNMDYxMTA4MDAwMDAwWhcNMzYwNzE2MjM1OTU5WjCByjEL\r\n" "MAkGA1UEBhMCVVMxFzAVBgNVBAoTDlZlcmlTaWduLCBJbmMuMR8wHQYDVQQLExZW\r\n" "ZXJpU2lnbiBUcnVzdCBOZXR3b3JrMTowOAYDVQQLEzEoYykgMjAwNiBWZXJpU2ln\r\n" "biwgSW5jLiAtIEZvciBhdXRob3JpemVkIHVzZSBvbmx5MUUwQwYDVQQDEzxWZXJp\r\n" "U2lnbiBDbGFzcyAzIFB1YmxpYyBQcmltYXJ5IENlcnRpZmljYXRpb24gQXV0aG9y\r\n" "aXR5IC0gRzUwggEiMA0GCSqGSIb3DQEBAQUAA4IBDwAwggEKAoIBAQCvJAgIKXo1\r\n" "nmAMqudLO07cfLw8RRy7K+D+KQL5VwijZIUVJ/XxrcgxiV0i6CqqpkKzj/i5Vbex\r\n" "t0uz/o9+B1fs70PbZmIVYc9gDaTY3vjgw2IIPVQT60nKWVSFJuUrjxuf6/WhkcIz\r\n" "SdhDY2pSS9KP6HBRTdGJaXvHcPaz3BJ023tdS1bTlr8Vd6Gw9KIl8q8ckmcY5fQG\r\n" "BO+QueQA5N06tRn/Arr0PO7gi+s3i+z016zy9vA9r911kTMZHRxAy3QkGSGT2RT+\r\n" "rCpSx4/VBEnkjWNHiDxpg8v+R70rfk/Fla4OndTRQ8Bnc+MUCH7lP59zuDMKz10/\r\n" "NIeWiu5T6CUVAgMBAAGjgbIwga8wDwYDVR0TAQH/BAUwAwEB/zAOBgNVHQ8BAf8E\r\n" "BAMCAQYwbQYIKwYBBQUHAQwEYTBfoV2gWzBZMFcwVRYJaW1hZ2UvZ2lmMCEwHzAH\r\n" "BgUrDgMCGgQUj+XTGoasjY5rw8+AatRIGCx7GS4wJRYjaHR0cDovL2xvZ28udmVy\r\n" "aXNpZ24uY29tL3ZzbG9nby5naWYwHQYDVR0OBBYEFH/TZafC3ey78DAJ80M5+gKv\r\n" "MzEzMA0GCSqGSIb3DQEBBQUAA4IBAQCTJEowX2LP2BqYLz3q3JktvXf2pXkiOOzE\r\n" "p6B4Eq1iDkVwZMXnl2YtmAl+X6/WzChl8gGqCBpH3vn5fJJaCGkgDdk+bW48DW7Y\r\n" "5gaRQBi5+MHt39tBquCWIMnNZBU4gcmU7qKEKQsTb47bDN0lAtukixlE0kF6BWlK\r\n" "WE9gyn6CagsCqiUXObXbf+eEZSqVir2G3l6BFoMtEMze/aiCKm0oHw0LxOXnGiYZ\r\n" "4fQRbxC1lfznQgUy286dUV4otp6F01vvpX1FQHKOtw5rDgb7MzVIcbidJ4vEZV8N\r\n" "hnacRHr2lVz2XTIIM6RUthg/aFzyQkqFOFSDX9HoLPKsEdao7WNq\r\n" "-----END CERTIFICATE-----\r\n"; |
Configuring endpoint and device name
In this tutorial, we will explore the subscribe_publish_sample application; the same configuration is required if you want to explore other sample apps.
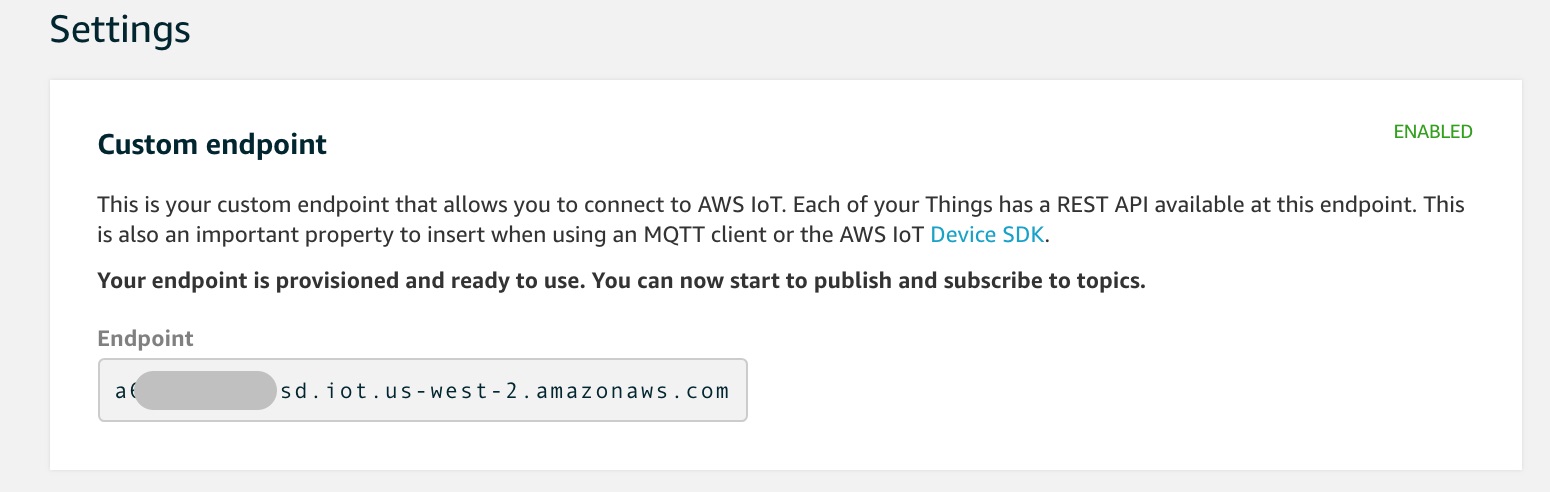
Go to the AWS IoT Console and select Settings from the left pane to find the custom REST API endpoint for your device.
Navigate to the ~/TizenRT/external/aws/samples/TizenRT/subscribe_publish_sample directory and change configurations in aws_iot_config.h.
AWS_IOT_MQTT_HOST should be defined as your Rest API Endpoint.
AWS_IOT_MQTT_CLIENT_ID should be unique for every device. Here, we are using “ARTIK055s_1” as an example.
AWS_IOT_MY_THING_NAME is the Thing we defined, ARTIK055s.
#define AWS_IOT_MQTT_HOST "a6e...9sd.iot.us-west-2.amazonaws.com" ///< Customer specific MQTT HOST. The same is used for Thing Shadow

#define AWS_IOT_MQTT_PORT 443 ///< default port for MQTT/S

#define AWS_IOT_MQTT_CLIENT_ID "ARTIK055s_1"

#define AWS_IOT_MY_THING_NAME "ARTIK055s"
Building Tizen RT Image
To compile and load images to ARTIK 05x, refer to the tutorial.
Configure ARTIK055s build
cd ~/TizenRT/os
./config.sh artik055s/extra
Configure menuconfig,
make menuconfig
Go to External Libraries by moving your cursor, enable “AWS IoT SDK”.

Exit this configuration page and from the main menu, go to Application Configuration->Examples-> enable “AWS demo application”
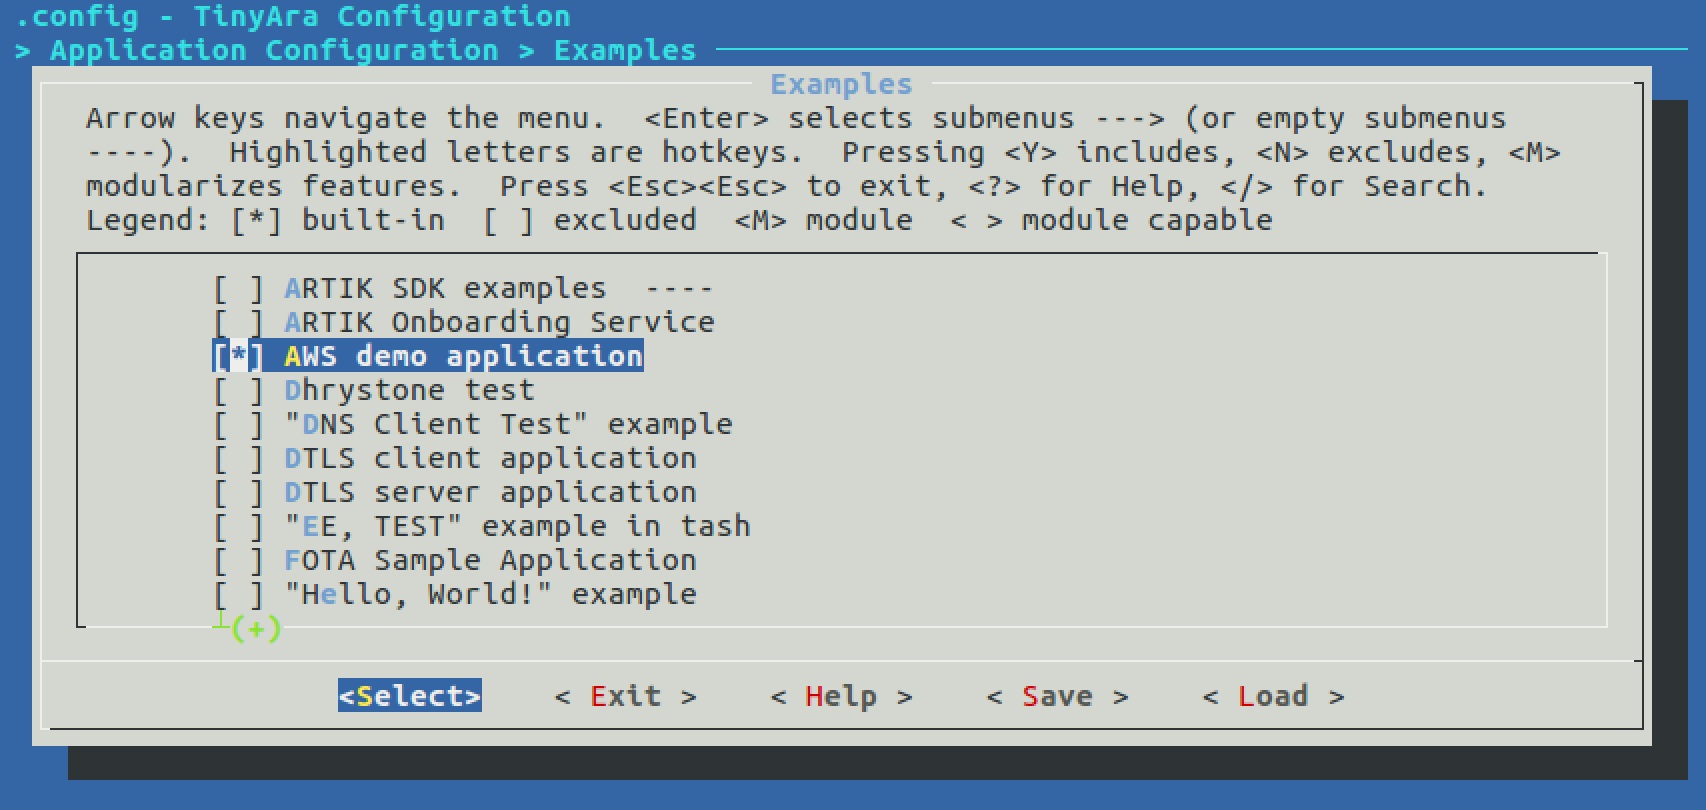
Exit menuconfig.
Build Tizen RT image and re-flash the device
make
make download ALL
Connecting ARTIK 05x to AWS IoT
Configure WiFi on ARTIK055s
Restart 055s, and configure Wi-Fi by following the Manually Set Up Wi-Fi section.
Configure device time
From TASH, configure your date to make sure it matches UTC time. This step is required; otherwise, the AWS server certificate cannot be verified.
TASH >> date –s Aug 12 12:00:05 2018
Alternatively, you can configure NTP settings programmatically. Refer to main.c in the MQTT article for an implementation reference.
Test AWS IoT integration
From TASH, you should be able to see a Tizen RT application aws_sample.
TASH>> aws_sample
usage : aws_sample <example_no>
ex) aws_sample 4 ==> runs aws_susbcribe_publish
1. aws_shadow
2. aws_shadow_console_echo
3. aws_subscribe_publish_library
4. aws_subscribe_publish
Launch the application with option 4, which invokes the subscribe_publish_sample app we configured earlier.
aws_sample 4
AWS IoT SDK Version 3.0.1-

Connecting...

Subscribing...

-->sleep

Subscribe callback

sdkTest/subhello from SDK QOS0 : 0 hello from SDK QOS0 : 0

Subscribe callback

sdkTest/subhello from SDK QOS1 : 1 hello from SDK QOS1 : 1

-->sleep

Subscribe callback

sdkTest/subhello from SDK QOS0 : 2 hello from SDK QOS0 : 2

Subscribe callback

sdkTest/subhello from SDK QOS1 : 3 hello from SDK QOS1 : 3

-->sleep

Subscribe callback

…