Taking Action with ARTIK Cloud
In this article, we'll focus on how the Samsung ARTIK Cloud can analyze data sent by the Samsung ARTIK module over MQTT, and send back appropriate Actions. And when we say "actions", we really mean it! You'll watch ARTIK Cloud trigger significant events.
Prerequisites
In preparation for this tutorial, you must:
-
Obtain a second ARTIK board, which you will provision as your outside temperature sensor and air conditioner unit control board
-
Complete the ARTIK Cloud – via Arduino tutorial; its concluding exercise is the starting point for the present tutorial
-
Open and log into My ARTIK Cloud and Developer Dashboard.
The time for completing this installment of the tutorial series is approximately 1 hour.
Choosing Delivery Method
Your application will have several options for communicating with ARTIK Cloud. Here we talk about the trade-offs of using each, and why we chose MQTT. You can skip to Defining Actions if you want to get right to building the demonstration platform.
Overview of Tradeoffs
The table below compares using MQTT protocol to Web REST API protocol, specifically in reference to ARTIK Cloud. We highlight the advantages of each. Note that using Web Sockets, if practical for your application, avoids all of these disadvantages.
| Topic | MQTT | Web REST API |
|---|---|---|
| Overhead | Minimal data structure size | Large nested data structure |
| Speed | Quick | Slower than MQTT due to SSL/TLS handshaking over HTTPS |
| Code complexity | Concise, simple code blocks | Usual bulky code for Web headers |
| Archived data retrieval | Not possible – must fall back on Web protocol to retrieve from ARTIK Cloud | Unified solution for sending messages and retrieving archived ones |
| Action Notify vs Subscribe | Subscribe model delivers Action immediately | Notification model requires subsequent follow-up Web call to retrieve Action list |
| Sending Actions to other devices | Cannot be done directly by MQTT clients (can be done indirectly through ARTIK Cloud) | Can be done directly by Web REST clients |
For our Economy A/C Database demonstration scenario, MQTT is the clear winner – despite its drawbacks. For your own application, you may decide to choose Web protocols, but also consider a hybrid model: Use MQTT for most transactions and Web API REST protocol for data retrieval tasks.
Tradeoffs by Protocol
MQTT
ARTIK Cloud MQTT handling is designed expressly for rapid, responsive service with low overhead costs. Over MQTT, ARTIK Cloud clients may:
- Send Data messages
- Subscribe to and receive Action messages directed to their Device ID
but
- Are not able to subscribe to or receive Data messages.
This is not as great a limitation as it seems. All messages (both Data and Action) are archived by ARTIK Cloud and can be retrieved by the client on demand using Web protocols. Sign in and check the data logs page, and you will see the messages that have accumulated from your testing so far.
Web REST API
Through the ARTIK Cloud API, Web REST clients do have a way to "subscribe", but it differs from MQTT in that only a notification, not the Action message, is delivered. Once notified, the client can request messages (including Actions) that are associated with that notification. Refer to the API Specification and to Subscribe and Notify for details.
Web REST clients can at any time retrieve any messages (including Actions) that have been archived on ARTIK Cloud. That is, subscription is not required if polling is the preferred option, and not subscribing does not prevent received messages from being archived.
WebSockets
ARTIK Cloud clients can use the WebSocket interface for all the same things as the Web REST API. In addition, this method offers a live and always-available feed of activity and data, so there are no limitations on notifications or response times. WebSockets are typically associated with applications needing greater throughput than required for ours, but you may want to consider them for yours. They are not addressed in this tutorial.
Tradeoffs by Data Direction
Our strategy is to use MQTT as our primary method of communication with ARTIK Cloud. By doing so, we are saying that it is sufficient to have only two transaction types:
- ARTIK Module –> ARTIK Cloud : Data only
- ARTIK Cloud –> ARTIK Module : Actions for module code to carry out
We describe below how outgoing and incoming payloads are handled in general, and within that context, how our strategy of choosing MQTT will play out.
Outgoing Payloads
Regardless of protocol, payloads that ARTIK module code might want to send to ARTIK Cloud can contain Data or an Action.
- Actions sent are executed by ARTIK Cloud as specified in the payload. MQTT clients are not allowed to deliver Action messages to ARTIK Cloud; only Web clients may.
- Data sent is archived by ARTIK Cloud, which also analyzes the data using Rules you have set up and generates Actions called for.
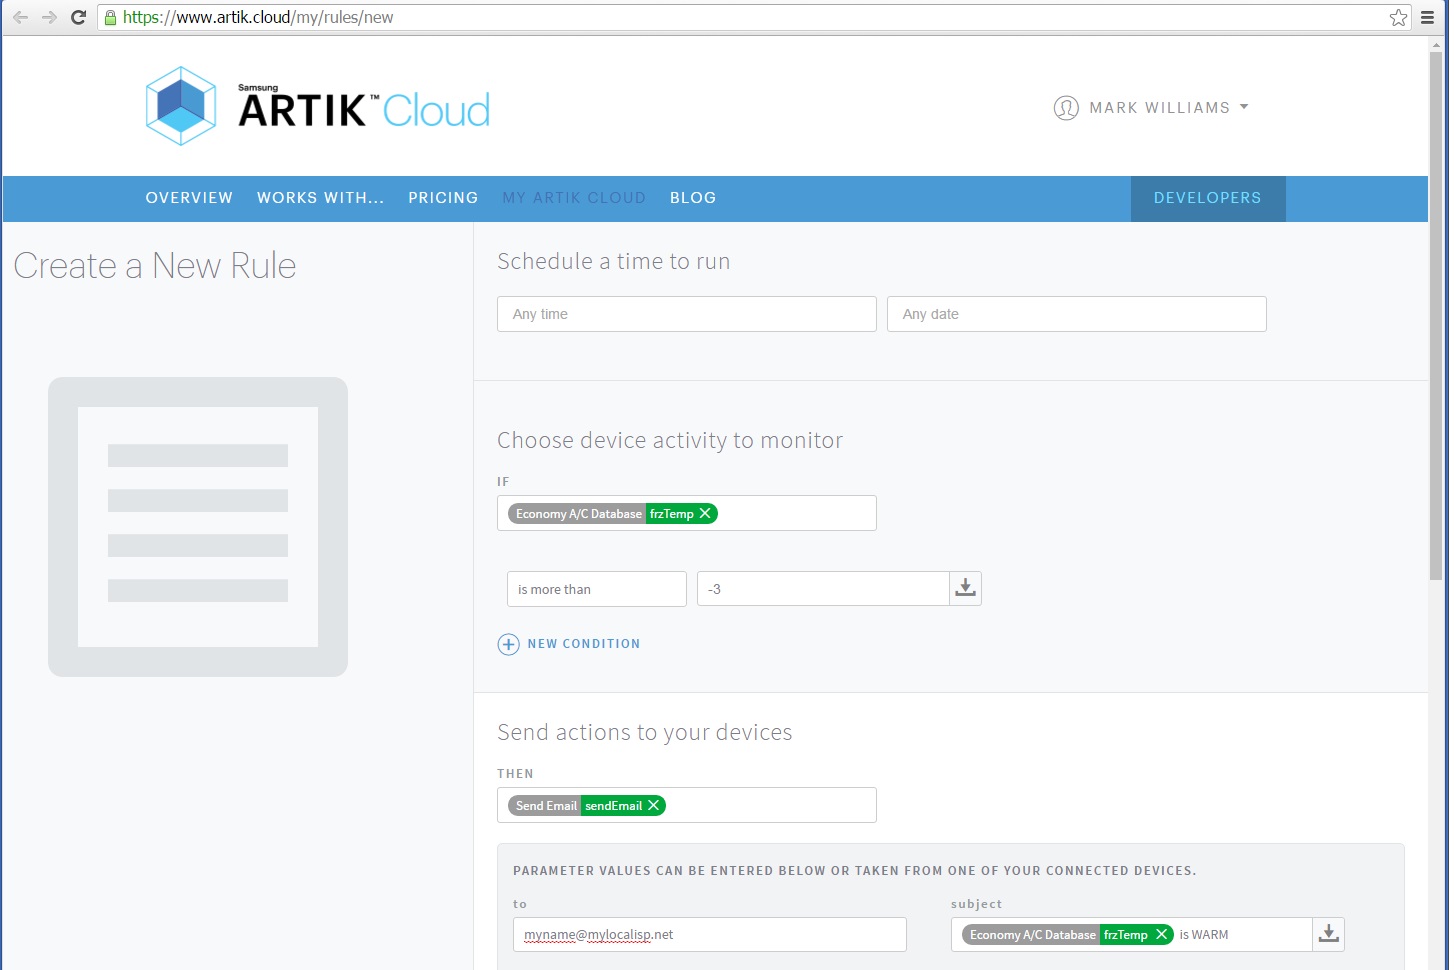
Because ARTIK Cloud can analyze and act on data content, the inability of MQTT clients to send Actions is not a limitation in most cases. The ARTIK Cloud mechanism for defining and enabling Actions it takes based on data received is found at the Rules page of My ARTIK Cloud. Go there now and try it out – you'll find it easy and quite intuitive.
In our scenario, we do not need to send Actions. We are counting on ARTIK Cloud Rules to generate Actions, both to the ARTIK module and to other devices, based on:
- Home control and sensor data that the ARTIK module sends to ARTIK Cloud
- Data and Actions that the power company sends to ARTIK Cloud.
In other words, we are depending on the intelligence of ARTIK Cloud to interpret data and send Actions on our behalf. This approach enables us to solely employ MQTT for our outgoing payload needs.
Incoming Payloads
Regardless of protocol, payloads the ARTIK module code might want to receive from ARTIK Cloud may contain Data or an Action.
-
Actions, possibly originating from other devices, explicitly direct the ARTIK module to do something. Only MQTT clients receive these directly. Web clients receive them only when they retrieve them as part of archived messages.
-
Data can only arrive by way of Web protocols. ARTIK Cloud clients cannot retrieve or subscribe to data messages via MQTT.
As an ARTIK Cloud MQTT client, the ARTIK module subscribes to messages intended for its Device ID. In our scenario, we need to receive Actions – directly from ARTIK Cloud, and indirectly from others by way of ARTIK Cloud Rules. Subscribing to them with MQTT is the fastest and most efficient way to get Actions, which the ARTIK module can then execute rapidly.
Our application is not retrieving data from ARTIK Cloud, so MQTT is sufficient for our incoming payload needs. You will have to decide whether you would need data retrieval, and therefore Web protocols, based on your own application requirements.
Defining Actions in ARTIK Cloud
Let's review our demonstration scenario, using the Economy A/C Database manifest.

This scenario is ideally suited to the MQTT-only method described above.
- Data and controls are all managed locally by the ARTIK module.
-
Relevant data is sent to the power company for archiving and analysis.
ARTIK Module –> ARTIK Cloud : Data only - The power company sends back actions to influence electric grid loading if needed.
ARTIK Cloud –> ARTIK Module : Actions only
Specifically, the power company wants to establish a small set of Actions it can send on very hot days.
| Action | ID | Description | Priority |
|---|---|---|---|
| Pre-cool house | actionPrecoolHouse | Request to cool down house early in anticipation of a warm afternoon | Low |
| Pre-cool refrigerator | actionPrecoolRefrig | Request to run food cooling appliances ahead of expected heat peak | Low |
| Set thermostat | actionSetLowTemp | Request to limit coolest setting on thermostat | Medium |
| Control A/C compressor | actionStopAC | Urgent need to immediately cycle off compressor to avoid imminent blackout | High |
In our scenario, we envision most of these requests to be under homeowner control. "Priority", from the power company perspective, means the following.
- Low: Customer can pre-configure their local system to prevent the request from being acted on (if, say, pre-cooling the refrigerator would ruin food for a person with special dietary needs).
- Medium: Customer can override the requests on a per-instance basis (for example, if the thermostat is blocked from being set below 75 degrees, the homeowner can hold the setting buttons for 10s to override).
- High: Customer is not allowed to override the Action.
While MQTT protocols offer Quality of Service levels to check for payload arrival, these alone would never be enough to guarantee that a High Priority Action was acted on. Therefore, it is up to your application to verify that such commands are carried out.
ARTIK Cloud delivers Actions with QoS 0 only. But even QoS 1 or 2 would not guarantee that a MQTT payload was not lost due to connectivity issues. While delivery loss is inconvenient, the harm is not irreparable. Source data and Actions can always be retrieved by polling ARTIK Cloud.
Decide Data and Actions of Interest
For our demonstration tests, our outgoing data of interest will be insTemp and outTemp. Our incoming Actions of interest will be actionSetLowTemp and actionStopAC. Here are the Rules we want to put in place.
-
When
outTempexceeds 40 C (104 F), the power company wants ARTIK Cloud to send asetTemperaturemessage with a parameter ofactionSetLowTempand a value of 24 C (75 F). -
When
insTempdrops below 15.5 C (60 F), the power company wants ARTIK Cloud to stop the air conditioning by sending asetOffmessage with a parameter ofactionStopAC. -
In a pending emergency blackout situation, the power company wants to directly command an Action via ARTIK Cloud to immediately shut off the A/C compressor unit using the same message as above.
Modify Manifest
To give your manifest new capabilities, use the same approach you did when setting it up originally, but this time select Actions.
-
Go to the ARTIK Cloud Developer Dashboard and log in.
-
Click on

^ then select Economy A/C Database -
Click on
+ New Version ^ -
Click on
+ Device Actions ^ -
Click through steps a–d below for
setTemperaturewith a parameter of 'actionSetLowTemp' and type 'Double'.+ New Action a. ^ Browse Standard Actions Save b. ^ then select setTemperature^ + New Parameter c. ^ then select actionSetLowTempData Type Save d. ^ then select Double^ -
Repeat steps a–d, this time for
setOffwith a parameter ofactionStopACand typeBoolean.
-
Click
Next: Activate Manifest. -
Click the list item that looks like this to get back to where you left off.

You have now added Actions to your project. All you have left to do on ARTIK Cloud is to define and activate the Rules needed to trigger these Actions, which we'll do in the Taking Action section after we have written code on the ARTIK Module side to receive and process Actions.
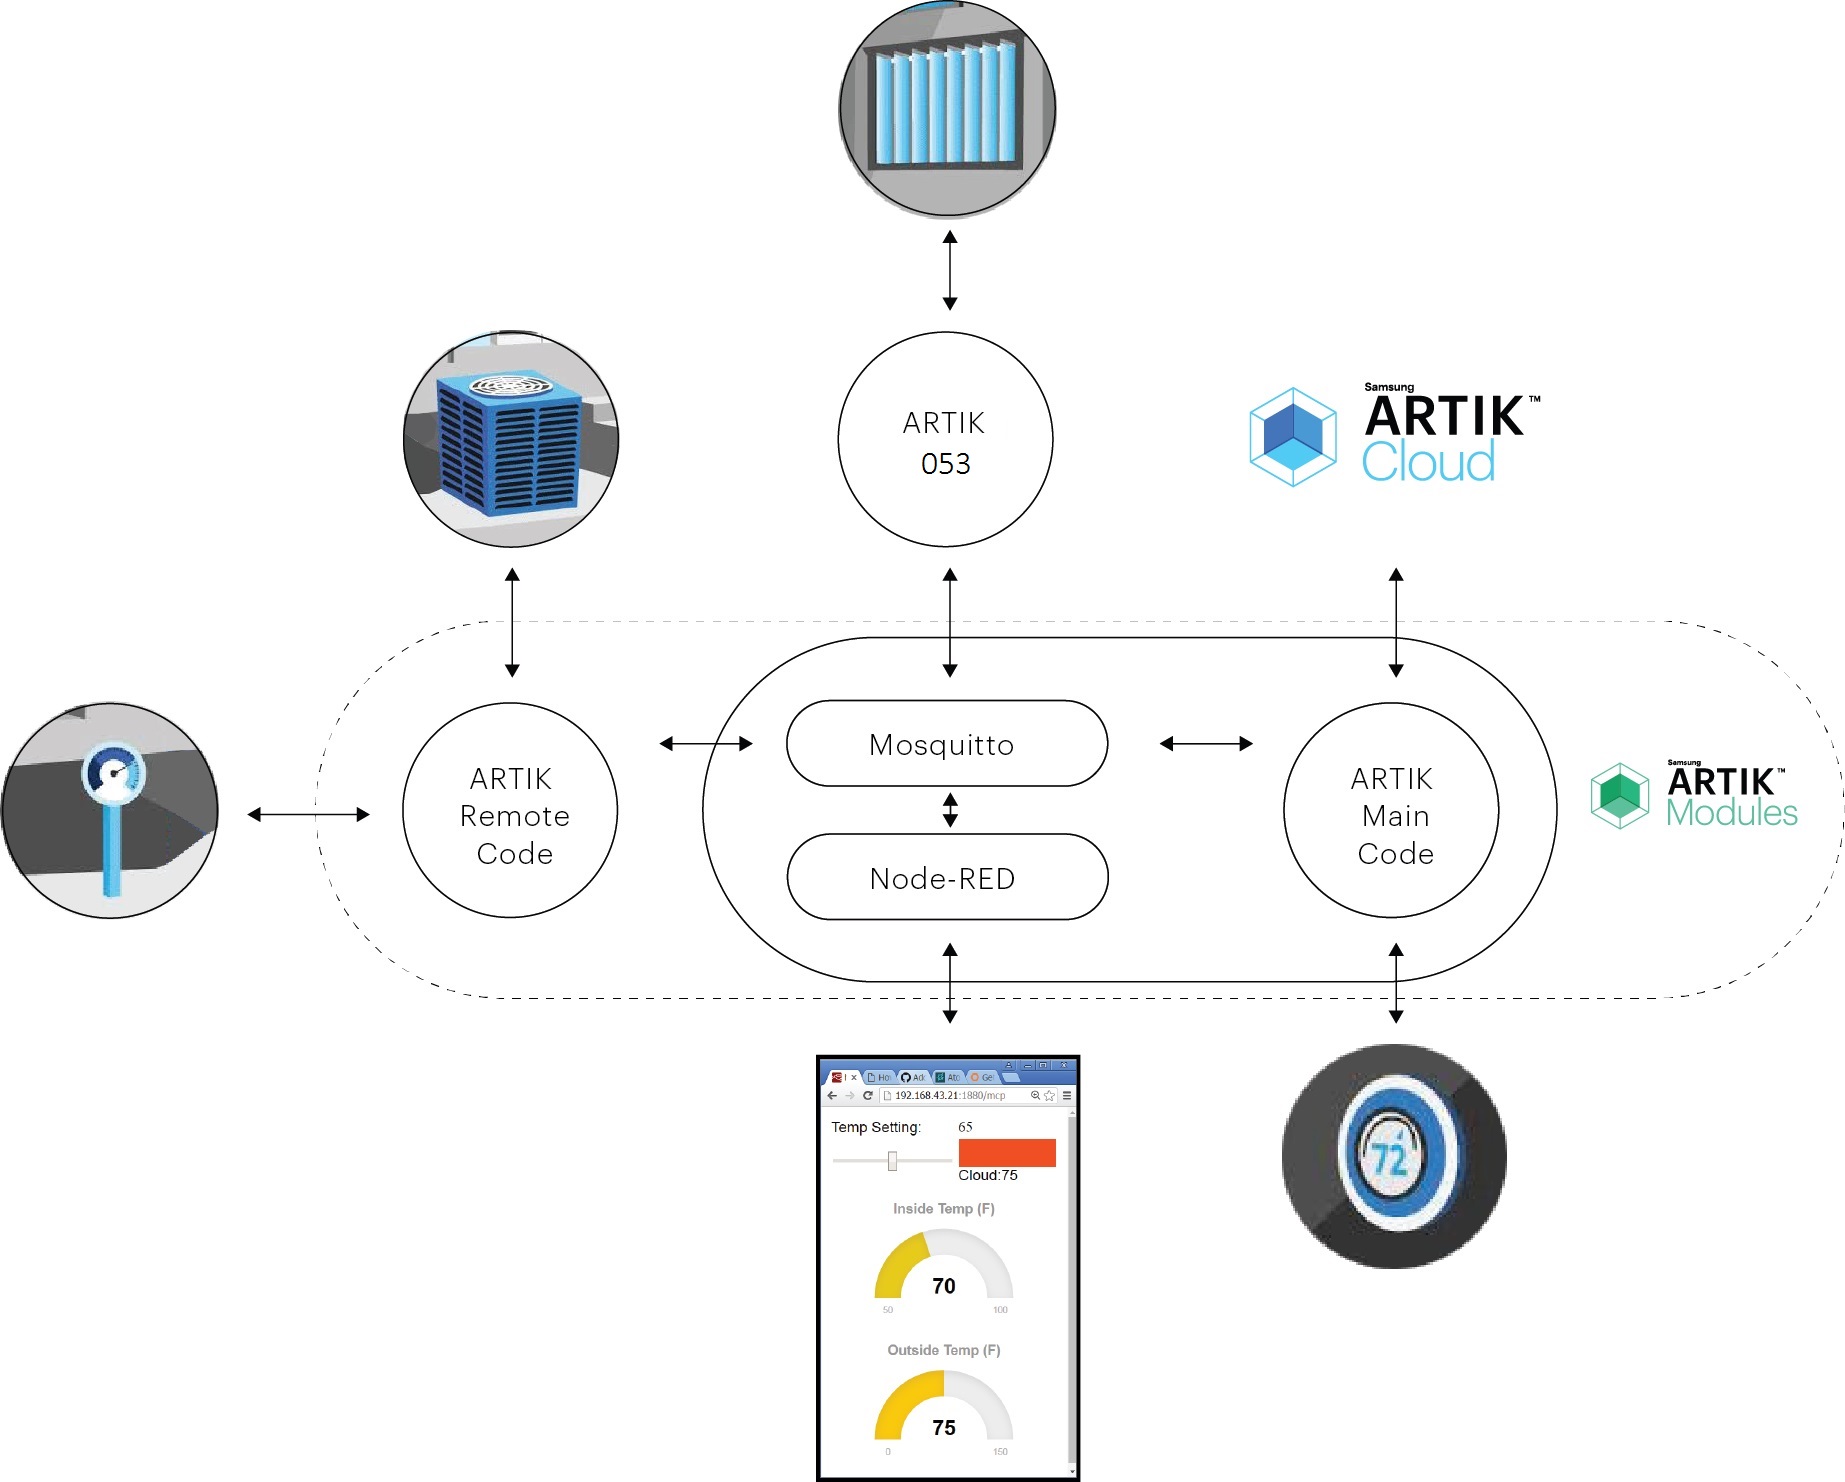
Assembling the Edge Devices
Since our demonstration scenario is for home air conditioning, the test platform we have in mind represents the edge device, temp sensor, and A/C compressor unit. We will base this on a second ARTIK development board, which we will call the remote board.
We will also use the ARTIK 053 device from the previous tutorial to control our shades, so that they open and close automatically depending on outside temperature.
Components
To have a little fun with our demonstration device, we modeled it on an outdoor air conditioner compressor unit and gave it sound effects. You can duplicate this, or can simply use an LED and earphones.
| GEARHEAD speaker | + Little Bits 5V Fan | = air conditioner |
|---|---|---|
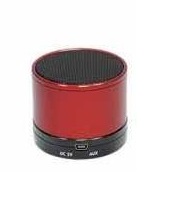 |
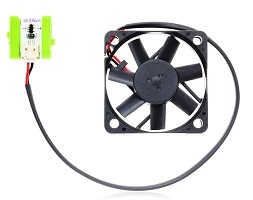 |
 |
The sound effects serve a practical purpose, demonstrating how to write Arduino code to trigger Linux® command line operations (in this case, playing an audio file). In a future tutorial, we will also use this setup to demonstrate Bluetooth® audio.
Connections
The following instructions refer to connecting the components to the remote ARTIK board. Power off while connecting.
- Speaker: Plug into ARTIK board audio output jack (charge with USB before using, then leave USB unconnected and put switch to AUX position).
- Photoresistor and resistor: Connect as on the original ARTIK board (like this).
- Fan: Attach GND to ARTIK GND, Vcc to ARTIK +5V, SIG to GPIO pin 2.

You may also want to connect a resistor (we chose 220 ohm) between SIG and GND. Otherwise, the signal floats and causes the fan to "flutter" while idle.
Coding / How It Works
As in previous tutorials, we supply insTemp readings from the primary ARTIK board. However, we will now use the remote ARTIK board outside to monitor and transmit outTemp readings and to control our improvised air conditioner. A Web-page control panel driven by Node-RED will display the data and provide threshold settings.
In this tutorial, we will scale the readings to make them a little more like real Fahrenheit temperatures (even though they will still come from photosensors instead of temperature sensors for quicker response). We will also name the published topics appropriately (for example, the 'brightness' topic we used for the ARTIK 053 module now changes to 'outTemp' for the ARTIK board).
Preparation
Here we will be referring to the main and remote ARTIK boards and associated code.
- Connect both ARTIK boards to the host PC, running separate USB cables and terminal emulator instances to each.
- Connect each board to Wi-Fi® through the usual
dhclient wlan0sequence, and check for correct connectivity. - Launch Mosquitto on the main board.
- Copy three sound effect files by right-clicking each of these links and saving to any convenient temporary location on your PC: ac.wav – ac-run.wav – ac-off.wav
- Use
scpto load the sound effects files to the root directory on the remote board.
Main ARTIK Controller Arduino Code
The Arduino code for the main board is provided below. It is similar to that developed in the previous tutorial but does not use Web calls. The code creates two MQTT clients: one to ARTIK Cloud (SSL/TLS-secured) and a separate one to Mosquitto (local and unsecured).
Improvements
We added a getIPAddress routine to simplify setup. Now, the Arduino code just reads the localhost address directly from an ifconfig wlan0 statement, so you need not specify the mqttServer address. To implement this, we use shell commands, which we'll talk about in the "remote" code section below.
We also needed a parseBuffer routine, sort of the inverse of the loadBuffer routine from previous tutorials, to deconstruct the incoming json payloads from ARTIK Cloud. You'll see an example in the Taking Action section of what those messages look like. It might help you understand this routine better.
Setup Instructions
- Copy the code below to the Arduino IDE, replacing Device ID in three places and Device Token in one place.
- Pick the correct network under Arduino Tools->Port.
- Compile and load the code to your main ARTIK board through the Arduino IDE.
1 2 3 4 5 6 7 8 9 10 11 12 13 14 15 16 17 18 19 20 21 22 23 24 25 26 27 28 29 30 31 32 33 34 35 36 37 38 39 40 41 42 43 44 45 46 47 48 49 50 51 52 53 54 55 56 57 58 59 60 61 62 63 64 65 66 67 68 69 70 71 72 73 74 75 76 77 78 79 80 81 82 83 84 85 86 87 88 89 90 91 92 93 94 95 96 97 98 99 100 101 102 103 104 105 106 107 108 109 110 111 112 113 114 115 116 117 118 119 120 121 122 123 124 125 126 127 128 129 130 131 132 133 134 135 136 137 138 139 140 141 142 143 144 145 146 147 148 149 150 151 152 153 154 155 156 157 158 159 160 161 162 163 164 165 166 167 168 169 170 171 172 173 174 175 | #include <WiFi.h> #include <MQTTClient.h> #include <ArduinoJson.h> #include <DebugSerial.h> //------------- // ARTIK Cloud MQTT params char mqttCloudServer[] = "api.artik.cloud"; int mqttCloudPort = 8883; char mqttCloudClientName[] = "ARTIK-Arduino"; char mqttCloudUsername[] = "_your_DEVICE_ID_goes_here_"; // FIX char mqttCloudPassword[] = "_your_DEVICE_TOKEN_goes_here_"; // FIX char mqttCloudDataOut[] = "/v1.1/messages/_your_DEVICE_ID_goes_here_"; // FIX char mqttCloudActionsIn[] = "/v1.1/actions/_your_DEVICE_ID_goes_here_"; // FIX WiFiSSLClient ipCloudStack; MQTTClient mqttCloudClient; //------------ // Mosquitto local MQTT params char mqttServer[16]; //ip address acquisition is automatic now int mqttPort = 1883; char mqttClientName[] = "ARTIK-Master Indoor"; float insTemp, desTemp = 80, outTemp, insTempPrev = 0; bool compOnCtl = false; int bufLength = 0; int scalingFactor; int debounce = 0; char buf[128]; WiFiClient ipStack; MQTTClient mqttClient; void setup() { DebugSerial.begin(115200); getIPAddress(); //automatic now scalingFactor = analogRead(0) / 37.5; mqttCloudClient.begin(mqttCloudServer, mqttCloudPort, ipCloudStack); DebugSerial.println("start ARTIK Cloud connect"); int rc = mqttCloudClient.connect(mqttCloudClientName, mqttCloudUsername, mqttCloudPassword); DebugSerial.print("connect result:"); DebugSerial.println(rc); mqttCloudClient.subscribe(mqttCloudActionsIn); mqttClient.begin(mqttServer, mqttPort, ipStack); if (!mqttClient.connected()) { mqttClient.connect(mqttClientName); delay(500); mqttClient.subscribe("outTemp"); mqttClient.subscribe("desTemp"); mqttClient.subscribe("insTemp"); } } void loop() { mqttClient.loop(); mqttCloudClient.loop(); delay(100); DebugSerial.print(debounce); DebugSerial.print("*"); insTemp = 110 - (analogRead(0) / scalingFactor); // from ARTIK photosensor if (insTemp < 50) insTemp = 50; if (insTemp > insTempPrev + 2 || insTemp < insTempPrev - 2) { sprintf(buf, "%4.0f", insTemp); mqttClient.publish("insTemp", buf); insTempPrev = insTemp; } if (insTemp > desTemp) { if (debounce++ > 7) { debounce = 12; //countdown value if (compOnCtl == false) { compOnCtl = true; mqttClient.publish("compOnCtl", "true"); DebugSerial.print("!"); } } } else { // insTemp must be <= desTemp if (debounce-- <= 0) { debounce = 0; if (compOnCtl == true) { compOnCtl = false; mqttClient.publish("compOnCtl", "false"); DebugSerial.print("X"); } } } } void getIPAddress() { //figure out IP address from ifconfig int indx = 0; Process p; p.runShellCommand("ifconfig wlan0 | grep 'inet ' | awk '{ print $2 }'"); while (p.running()); while (p.available()) { char c = p.read(); mqttServer[indx++] = c; } mqttServer[indx - 1] = '\0'; DebugSerial.print("wlan0 IP address:"); DebugSerial.println(mqttServer); } void messageReceived(String topic, String payload, char * bytes, unsigned int length) { String s = payload;// convert payload to float float temp = s.toFloat(); if (topic == "outTemp") { // from remote sensor outTemp = temp; sendToArtikCloud(insTemp, desTemp, outTemp); } else if (topic == "insTemp") { // from internal analog read insTemp = temp; sendToArtikCloud(insTemp, desTemp, outTemp); } else if (topic == "desTemp") { // from Node-RED slider desTemp = temp; insTempPrev = 0; // force trigger of new sensing round DebugSerial.print("desTemp:"); DebugSerial.println(desTemp); sendToArtikCloud(insTemp, desTemp, outTemp); } else { DebugSerial.print("Action:"); // parseBuffer(payload); } } void sendToArtikCloud(float insTemp, float desTemp, float outTemp) { loadBuffer(insTemp, desTemp, outTemp); // load current values into the buffer mqttCloudClient.publish(mqttCloudDataOut, buf); } void loadBuffer(float insTemp, float desTemp, float outTemp) { StaticJsonBuffer<200> jsonBuffer; JsonObject& dataPair = jsonBuffer.createObject(); dataPair["insTemp"] = insTemp; dataPair["desTemp"] = desTemp; dataPair["outTemp"] = outTemp; dataPair.printTo(buf, sizeof(buf)); } void parseBuffer(String _payload) { StaticJsonBuffer<200> jsonBuffer; String json = _payload; JsonObject& root = jsonBuffer.parseObject(json); const char* nameparam = root["actions"][0]["name"]; const char* actionSetLowTemp = root["actions"][0]["parameters"]["actionSetLowTemp"]; const char* actionStopAC = root["actions"][0]["parameters"]["actionStopAC"]; DebugSerial.print(nameparam); DebugSerial.print(actionSetLowTemp); DebugSerial.println(actionStopAC); if (strcmp(nameparam, "setTemperature") == 0) { desTemp = String(actionSetLowTemp).toFloat(); mqttClient.publish("desTemp", actionSetLowTemp); } if (strcmp(nameparam, "setOff") == 0) { compOnCtl = false; mqttClient.publish("compOnCtl", "false"); } } |
Remote A/C Unit ARTIK Controller Arduino Code
For the outdoor temp sensor and A/C Unit Controller, we require only a tiny amount of code to publish outTemp and to subscribe to receive compOnCtl commands.
Improvements
Note the Process class runShellCommand operations. They bring the convenience of Linux command line operations into our Arduino sketch. Using them here, we:
- Play a "sound effect" file each time we receive a control command over MQTT telling us to turn the compressor on or off.
- Run a script to read and figure out who our local MQTT broker is automatically, eliminating the need to manually change the IP address in the sketch.
The curl command string may look strange, but it's just trying to open the MQTT port at each IP address to see if it gets a "connected" state. Only the address of the MQTT broker will return this state successfully, with a line beginning with an asterisk (*).
Try copying the command strings themselves to your Linux prompt to run them and see how they work. Once you see how easy it is, we're sure you will find many additional ways to use runShellCommand routines.
Setup Instructions
- Copy the code below to the Arduino IDE.
- Pick the correct network (the other one this time) under Arduino Tools->Port.
- Compile and load the code to your remote ARTIK board through the Arduino IDE.
1 2 3 4 5 6 7 8 9 10 11 12 13 14 15 16 17 18 19 20 21 22 23 24 25 26 27 28 29 30 31 32 33 34 35 36 37 38 39 40 41 42 43 44 45 46 47 48 49 50 51 52 53 54 55 56 57 58 59 60 61 62 63 64 65 66 67 68 69 70 71 72 73 74 75 76 77 78 79 80 81 82 83 84 85 86 87 88 89 90 91 92 93 94 95 96 97 98 99 100 101 102 103 104 105 106 107 108 109 110 111 112 113 114 115 116 117 118 119 120 121 122 123 124 125 126 127 128 129 130 131 | // THIS SKETCH IS FOR STANDALONE ARTIK ACTING AS OUTDOOR TEMP SENSOR / AC COMPRESSOR CONTROLLER #include <WiFi.h> #include <MQTTClient.h> #include <DebugSerial.h> //------------- // Mosquitto local MQTT params char mqttServer[16]; int mqttPort = 1883; char mqttClientName[] = "ARTIK-Remote A/C"; float outTemp, outTempPrev = 0; bool compOnCtl = false; int retryCount = 0; int bufLength = 0; int scalingFactor; FILE * ipFile; FILE * checkFile; char buf[128]; WiFiClient ipStack; MQTTClient mqttClient; Process p; void setup() { int rc = 0; DebugSerial.begin(115200); pinMode(2, OUTPUT); scalingFactor = analogRead(0) / 75; if (scalingFactor < 5) scalingFactor = 5; // avoid div by 0 later // this command saves list of possible ip addresses Process ip; String ipcmd = "ip neigh | grep 'lladdr' | grep -F '.' | awk '{ print $1 }' > ipneighbors"; ip.runShellCommand(ipcmd); ipFile = fopen("ipneighbors", "r"); //this section tries each neighboring address to see if port 1883 is open //if curl can connect, it's an MQTT broker int checkSize = 0; char curlcode[20]; do { fgets(mqttServer, 20, ipFile); DebugSerial.print("Trying:"); DebugSerial.println(mqttServer); char * e = strchr(mqttServer, '\n'); //search for CR if (e == NULL) { DebugSerial.println("No MQTT broker found!"); exit(0); } int eolPosn = ((int)(e - mqttServer)); mqttServer[eolPosn] = '\0'; //replace with EOL String cmdline = "curl -vs --connect-timeout 2 http://" + String(mqttServer) + ":1883 2>&1 | grep 'Connected' > out"; ip.runShellCommand(cmdline); //If the word "connected" isn't found then it's not an MQTT broker port checkFile = fopen("out", "r"); fgets(curlcode, 12, checkFile); fclose(checkFile); } while (curlcode[0] != '*'); fclose(ipFile); mqttClient.begin(mqttServer, mqttPort, ipStack); } void loop() { if (!mqttClient.connected()) { DebugSerial.println("reconnecting"); mqttClient.connect(mqttClientName); delay(500); if (mqttClient.connected()) { retryCount = 0; mqttClient.subscribe("compOnCtl"); } else retryCount = retryCount + 1; if (retryCount > 10) mqttClient.disconnect(); } else { mqttClient.loop(); delay(100); } outTemp = 150 - (analogRead(0) / scalingFactor); // from ARTIK photosensor if (outTemp < 0) outTemp = 0; if (outTemp > outTempPrev + 2 || outTemp < outTempPrev - 2) { sprintf(buf, "%4.0f", outTemp); mqttClient.publish("outTemp", buf); outTempPrev = outTemp; if (outTemp < 40) { digitalWrite(2, LOW); // turn fan off p.runShellCommand("aplay ac-off.wav --nonblock --quiet"); } if (outTemp > 80) mqttClient.publish("color", "RED"); DebugSerial.print("*"); DebugSerial.print(buf); } if (compOnCtl == true) { if (p.running() == false) p.runShellCommandAsynchronously("aplay ac-run.wav --nonblock --quiet ");//foreground mqttClient.publish("color", "GREEN"); } } void messageReceived(String topic, String payload, char * bytes, unsigned int length) { if (topic == "compOnCtl") { // command from main controller DebugSerial.print("\ncompOnCtl:"); DebugSerial.println(payload); if (payload[0] == 't') { // true if (compOnCtl == false) { digitalWrite(2, HIGH); // turn fan on p.runShellCommand("aplay ac.wav --nonblock --quiet &"); compOnCtl = true; DebugSerial.println("*ON*"); } } else if (payload[0] == 'f') { // false if (compOnCtl == true) { while (p.running()); // wait for prior audio to complete digitalWrite(2, LOW); // turn fan off p.runShellCommand("aplay ac-off.wav --nonblock --quiet &"); compOnCtl = false; DebugSerial.println("*OFF*"); } } } } |
ARTIK 053 Code
As an example of how the window shades might be conveniently controlled, we use the ARTIK 053 module with its code pretty much unchanged from previous tutorials. We just send a "RED" command when outdoor temperatures exceed 80 F, and send a "GREEN" command once the air conditioner has been turned on. If you have actual hardware available to control, try some experiments with the ARTIK 053 GPIO pins!
Setup Instructions
Nothing changes for the ARTIK 053 setup. We haven't implemented the automatic IP address code for the ARTIK 053 module, so don't forget to change it manually to match that of the MQTT broker.
As soon as you apply power to the ARTIK 053 module, you should see a 'connect' message from Mosquitto.
Node-RED Code
For our Node-RED code, the most significant change comes with introduction of context variables, replacing the copy-to-file scheme we used previously. We also made the control panel much nicer.
Setup Instructions
Make sure you have Mosquitto running.
- Launch Node-RED on your ARTIK board as you would normally do.
- Open your Node-RED browser window at
localhost:1880/#as usual. - Right-click on this flow file link to save the complete set of nodes.
- Open the file in your text editor to replace the IP address entry after
"broker":with yourlocalhostaddress, then save and copy the text to your clipboard. - Import it to Node-RED through the Clipboard.
- Click Deploy and check that all MQTT nodes are connected.
- Open another browser window at
localhost:1880/mcpto display the gauges and slider control.
How it Works: Function Node Code
Node-RED allows assignment of node variables that persist between invocations. The variable can be accessible just by that Function node (context), by all Function nodes on the page (flow), or by all Function nodes across all pages (global). We only need flow level persistence for this exercise.
If you open any one of the function nodes connected to the MQTT input nodes, you will see code like:
1 | flow.set('insTemp',msg.payload); |
where we have assigned the MQTT payload to a flow-wide variable called insTemp.
Now open the Function node connected to the HTTP [get] /data node. The code creates a nested /data object that can be sent to the HTML page generated by our Template node.
1 2 3 4 5 6 7 | var data = { insTemp: parseInt(flow.get('insTemp')), outTemp: parseInt(flow.get('outTemp')), desTemp: parseInt(flow.get('desTemp')) } msg.payload = data; return msg; |
How it Works: Template Node HTML Code
The Template HTML code is significantly improved. We incorporate gauges from JustGage to show the incoming published sensor values. The layout is more mobile-friendly so that you can use your Wi-Fi-enabled cell phone for monitoring and control.
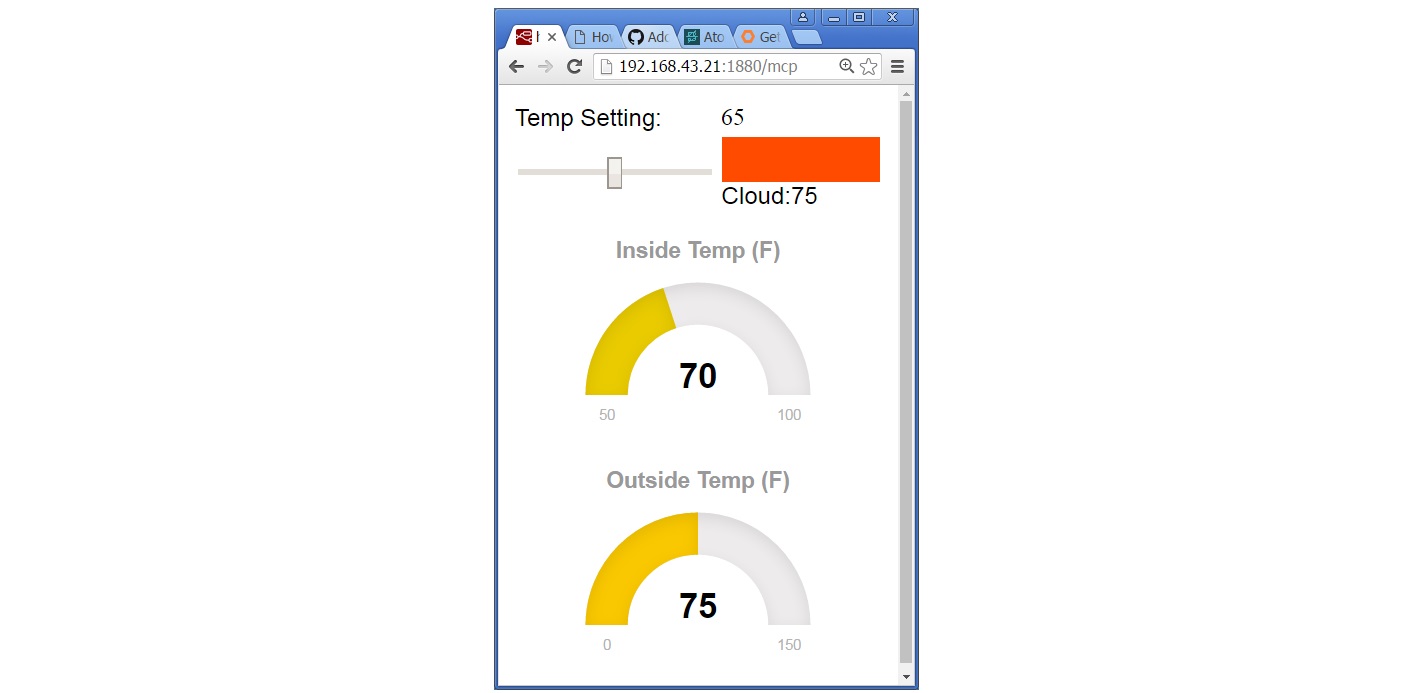
To feed the gauges, we take the incoming /data object and parse it into obj, whose insTemp, desTemp, and outTemp elements we can access individually. If we had tried to access the context variables directly by using a reference like {{insTemp}}, they would not be updated dynamically. By contrast, the /data object gets resent to the page every time function myTimer() executes.
1 2 3 4 5 6 7 8 9 10 11 12 13 14 15 16 17 18 19 20 21 22 23 24 25 26 27 28 29 30 31 32 33 34 35 36 37 38 39 40 41 42 43 44 45 46 47 48 49 50 51 52 53 54 55 56 57 58 59 60 61 62 63 64 65 66 67 68 69 70 71 72 73 74 75 76 77 78 79 80 81 82 83 84 85 86 87 88 89 90 91 92 93 94 95 96 97 98 99 100 101 102 103 104 105 106 107 108 109 110 111 112 113 114 115 116 117 118 119 120 121 122 123 124 125 126 127 128 129 130 131 132 133 134 135 136 137 138 139 140 141 142 143 144 145 146 147 148 149 150 151 | <html> <head> <script src="http://cdnjs.cloudflare.com/ajax/libs/raphael/2.1.4/raphael-min.js"></script> <script src="http://cdn.jsdelivr.net/justgage/1.0.1/justgage.min.js"></script> <style> html { font-family: Arial; } </style> </head> <body> <table width="250"> <tr> <td>Temp Setting: </td> <td id="valGreen">80</td> </tr> <tr> <td width="75%"><input onchange="changeGreen(this.value)" type="range" id="slideGreen" value="80" min="60" max="90" style="width:90%"></td> <td><div id="change" style="height:35px"></div></td> </tr> <tr> <td id="acIcon"></td> <td><div id="changetxt"></div></td> </tr> <tr> <td colspan=3 id="gauge2" class="200x140px"></td> </tr> <tr> <td colspan=3 id="gauge" class="200x160px"></td> </tr> </table> <table> <tr> <td align="center" style="width:70%">Manual AC Control </td> <td> <button onclick="acOn()">ON</button> <button onclick="acOff()">OFF</button> </td> <td></td> </tr> </table> <script> function acOn() { console.log('AC on'); } function acOff() { console.log('AC off'); } var x; var iconColor = 'Black'; var myVar = setInterval(myTimer, 500); function myTimer() { // Get incoming data from MQTT nodes as part of "data" object var obj; var site = new XMLHttpRequest(); site.open("GET", "/data", true); site.send(); site.onreadystatechange = function() { if (site.readyState == 4 && site.status == 200) { obj = JSON.parse(site.responseText); console.log(obj); // Refresh the gauges g2.refresh(obj.insTemp); g.refresh(obj.outTemp); // Refresh the slider area document.getElementById('slideGreen').value = obj.desTemp; var valGreen = parseInt(document.getElementById('valGreen').innerHTML); if (obj.desTemp != valGreen) { document.getElementById('change').style.backgroundColor = "rgb(255," + obj.desTemp + ", 0)"; document.getElementById('changetxt').innerHTML = "Action:" + obj.desTemp; } else { document.getElementById('change').style.backgroundColor = "rgb(0," + Math.floor(obj.desTemp * 2.5) + ", 0)"; document.getElementById('changetxt').innerHTML = obj.desTemp; } if (obj.compOnCtl == "true") { if (iconColor=='Black') { document.getElementById('acIcon').innerHTML = "<font color='Gray' size='24'><b>*</b></font>"; iconColor='Gray'; } else { document.getElementById('acIcon').innerHTML = "<font color='Black' size='24'><b>*</b></font>"; iconColor='Black'; } } else { document.getElementById('acIcon').innerHTML = "<font color='LightGray' size='24'><b>*</b></font>"; } } } } </script> <script> var g = new JustGage({ id: "gauge", value: 70, min: 0, max: 150, title: "Outside Temp (F)" }); var g2 = new JustGage({ id: "gauge2", value: 70, min: 50, max: 100, title: "Inside Temp (F)" }); </script> <script> changeAll(); function changeGreen(value) { document.getElementById('valGreen').innerHTML = value; changeAll(); } function changeAll() { var g = document.getElementById('valGreen').innerHTML; var r = 0; var b = 0; // Send out new slider setting var MQTTsite = new XMLHttpRequest(); MQTTsite.open("POST", "/mcp", true); MQTTsite.setRequestHeader('Content-Type', 'application/json'); MQTTsite.send(JSON.stringify({ "sliderSetting": g })); } </script> </body> </html> |
Final Setup Checklist
Up to this point, you should have set up the following.
Main ARTIK Board
- Photosensor (
insTemp) still in place from previous tutorial - Load Mosquitto and Node-RED
- Load Arduino program to communicate with remote board, Node-RED, and ARTIK Cloud, and to read sensor
- Ensure Device ID (2x) and Device Token are correct.
Remote ARTIK Board
- Add photosensor (
outTemp) same as on first board - Connect fan (or LED) and speaker
- Load Arduino program to read sensor, communicate with first board, and control model A/C unit
- Load sound effects
.wavfiles.
ARTIK 053 Board
- Check and make sure IP address is correct.
Node-RED Browser Windows
- Deploy main flow from
localhost:1880/# - Bring up Web control panel at
localhost:1880/mcp
Now comes the easy part: Programming ARTIK Cloud with Rules.
Taking Action
With our infrastructure ready, it's a simple matter to teach ARTIK Cloud the rules of when and why it should send Actions.
Set Up Rules
Rules are set up through My ARTIK Cloud (not the Developer Dashboard).
-
Go to My ARTIK Cloud and log in.
-
Click on
My ARTIK Cloud ^ then select Rules -
Click on
+ New Rule ^ -
Set up Rules as follows.
- IF Economy A/C Database outTemp is more than 104 and desTemp is less than 75 THEN send to Economy A/C Database the action setTemperature with actionSetLowTemp = 75
- IF Economy A/C Database insTemp is less than 60 THEN send to Economy A/C Database the action setOff with actionStopAC = true

That's it! That's all there is to creating Rules to make Actions take place.
Test 1: Turn on the Air Conditioner
The slider on the Web display panel stands in for the homeowner's thermostat temperature setting control. Let's try it out.
- Slide the temperature setting to the left.
- Verify that the sound effect is triggered and the fan turns on.
- Slide the control back and forth to check it out thoroughly.
- Finish up by moving the control to the left so that the fan stays on.
Note in the code that the displayed temperature setting is returned through the MQTT path. If you open a second instance of this Web page on a mobile device, you will see that both reflect the settings of each other.
Test 2: Check the AC Compressor Cycling
Let's verify that the ARTIK Cloud compressor shutdown rule is having the desired effect.
To test the rule: Verify the Disable AC Compressor rule by using the mouse to hover over the rule to make its Test button appear, then click it.
| > Test |
|---|
| ^ |
You can see that the Compressor on the outside temp controller board has been turned off. The message coming from ARTIK Cloud looks like this.
{"actions":[{"name":"setOff","parameters":{"actionStopAC":true}}]}
The main ARTIK module receives this action and sends out the local message
mqttClient.publish("compOnCtl","false");
To restore operation: Slide the temperature control to a higher temperature, and then to a lower one again.
To verify real operation: We need to "fool" our stand-in temperature sensor into returning a "cold" value. Shine a light on the photosensor – when it gets below 60 F, you should see the Rule from ARTIK Cloud take effect.
Test 3: Close the Blinds
To represent possible operation of controlled blinds, we have the ARTIK 053 board set to change color when the outside temperature goes up or the AC turns on. You could easily connect its GPIO pins to a relay to control motorized drapes or blinds in the house.
- Wave your hand over the outdoor temperature sensor (remote ARTIK board).
- Verify that the red LED comes on.
- Slide the temperature control so that the A/C turns on.
- Verify that the green LED comes on.
Test 4: Check the Thermostat Limit
Let's make sure automatic indoor temperature limiting is applied when outside temperatures get high.
- Slide the control and set Desired Temp to 68 F (or thereabouts).
- Hold your hand over the remote temperature sensor board to simulate an increase in temperature. Watch the Web console outdoor temperature indicator.
- When the outdoor temp gets above 104 F, notice the slider. You should see that it has reset to 75 F.
Summary
You have seen how a small amount of MQTT code can support a sophisticated application, easily handling the typical needs of a complex IoT solution. You set up Actions from ARTIK Cloud to interact with the local code – and it was not all that difficult!
We hope you noticed how minor a task it is to make real "actions" take place. You can play an audio or video clip, trigger recording of one, or do a hundred other things, just as simply as you can toggle an I/O pin. So why settle for just bare minimum functionality in your project?
Coming up next: We take care of some unanswered questions.
-
Our current design used a sensor link that, at most, you password-protected for security. However, it was not SSL/TLS-secured. A determined hacker could eventually break it. That sensor data – temperature readings – is of seemingly little value for a hacker to exploit. But what if an evil-doer could inject false readings throughout the neighborhood to the point where it triggers a power grid overload?
-
Compiling and loading an Arduino sketch is pretty straightforward, but as you saw here, it got pretty complicated to do it with two boards. Then there's the matter of loading Mosquitto and Node-RED. Wouldn't it be nice to have them all self-load on reset?
-
Connecting to Wi-Fi sometimes seems hit-and-miss. You may have noticed that our remote board code attempts to reconnect when its connection is lost. How can we extend that ease-of-use and reliability across all devices in our IoT network?
Jump right to the Secure Deployment article for all the details!